DIY & Maintenance · 6 min read · 11 June 2026
How to Build a Retaining Wall: A UK Step-by-Step Guide (Heights, Drainage & Real Costs)
Most garden retaining walls do not fail because the blocks were laid badly. They fail because nobody diagnosed the slope, and nobody gave the water anywhere to go.
By the Nims Casa editorial team — written from professional cleaning experience and checked against our editorial standards.
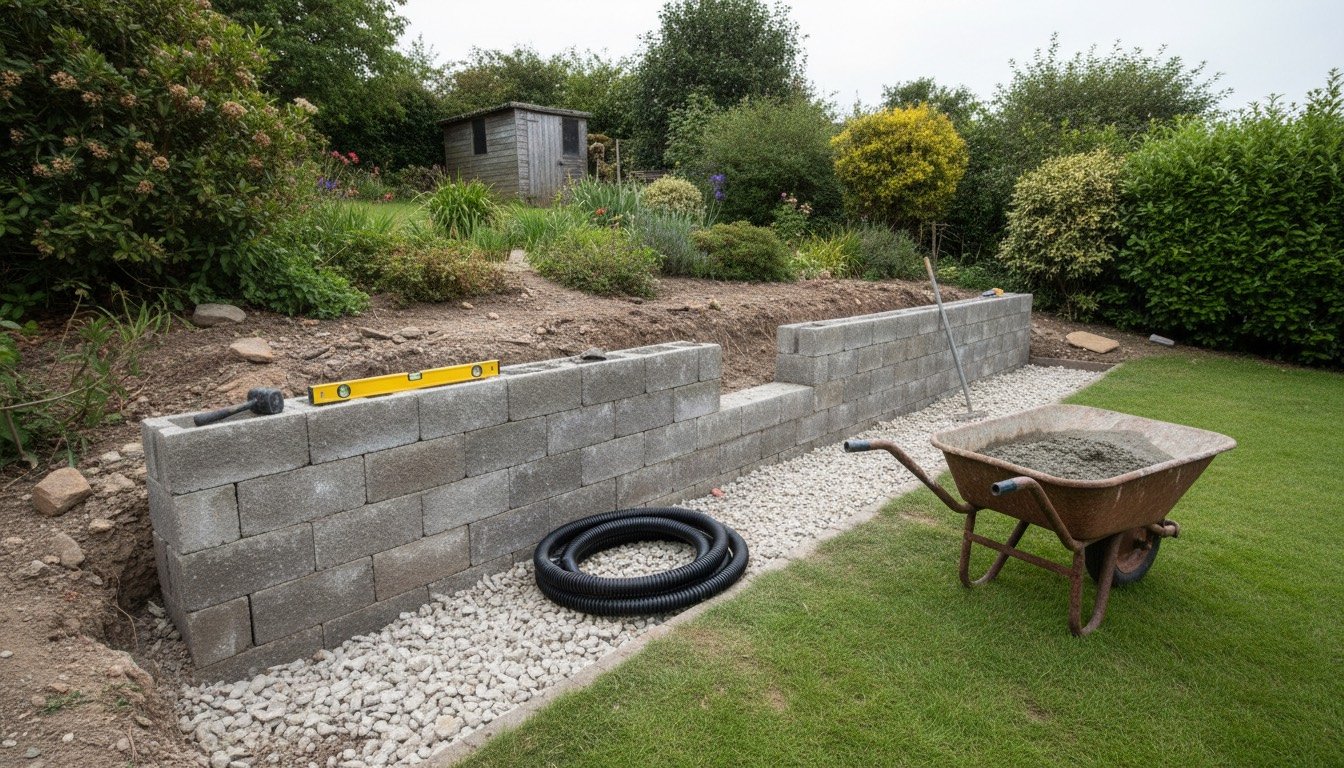
A 600mm sleeper wall holding back a flower border and a 1.4m block wall holding up a driveway are not the same job with bigger numbers. Double the height and the sideways push roughly quadruples. That is why so many DIY walls stand two winters and then lean.
Before you order a pallet of blocks, work out what your slope is doing. Half the walls we get called out to rebuild were the wrong answer: the ground moved because water had nowhere to drain, and the wall gave that water something new to shove over.
Step one is a diagnosis, not a design
Walk the slope after a heavy October downpour, not on a dry July afternoon, then match what you see to the list below. The symptom tells you whether you need a structure, a drain, or a different plan.
If the honest answer is "the bank slumps and looks scruffy", terracing with deep-rooted planting outlasts a wall at a fifth of the cost — a decision that belongs at the start, when you plan a landscape design.
- •Soil creeps onto the path after rain, nothing above it, drop under 600mm — a shallow surface slip. Terracing is plenty.
- •An existing wall leans out at the top, base sound — overturning, from no footing or one too narrow. Rebuild; do not prop or repoint.
- •It bulges mid-height and the face is permanently green and wet — water pressure behind. Fix drainage first or the replacement fails identically.
- •Rust staining at the base and silted weep holes — drainage exists but has blocked. Often rescuable by renewing the stone and land drain.
- •A vertical crack at the steps, or one end dropped — settlement. The footing is on made ground or soft fill.
- •A drive, shed base or neighbour's fence within a metre of the top — that is surcharge. Stop and have it designed.
- •Springy underfoot with water emerging partway down the bank — perched water. A drainage job with a wall attached.
Heights, planning permission and the legal edges
Keep a DIY wall to 1m of retained height; 600–900mm is the comfortable zone for a first attempt. Above 1m, or wherever the ground above carries a load, get a structural engineer's design: £400–£900 for a domestic calculation is cheap against a rebuild.
Planning permission is generally needed above 1m next to a highway (footpaths count) or above 2m elsewhere, with conservation areas changing the answer — our guide to when you need planning permission covers the thresholds. Excavating within 3m of a neighbour's building and deeper than their foundations triggers the Party Wall etc. Act 1996; notice runs two months.
Safety first
Trench collapse is the risk that kills people on small sites. Never work in an unsupported excavation deeper than your knee in soft or made ground, batter the sides back, and keep the spoil heap a metre clear of the edge.
Run a cable detector over the line first — armoured cable to a shed and shallow water pipes are rarely where the deeds suggest. Cutting blocks dry throws respirable crystalline silica, so use water suppression plus an FFP3 mask and goggles.
Tools, materials, time and cost
Figures below are for an 8m run at 750mm retained height in concrete blocks. Sleepers go up faster; blocks last longer and cope better with wet clay.
Budget £110–£180 per linear metre in DIY materials for blocks, or £90–£150 for new softwood sleepers. A landscaper usually quotes £280–£550 per metre fitted, more where access is through the house — see our UK landscaping cost guide.
- •Tools: spade, mattock, barrow, 1.2m spirit level, string line and pins, rubber mallet, brick trowel, bolster, lump hammer, mixing tub.
- •Hire: plate compactor £35–£50 a day; cut-off saw £40–£60 a day; mini digger and operator £250–£350 a day if the dig exceeds roughly 4 cubic metres.
- •Materials: 100mm dense concrete blocks (140mm for taller runs), MOT Type 1, C20 concrete (ready-mix from about £120 per cubic metre), 20mm clean angular stone, 100mm perforated land drain, non-woven geotextile, sand, cement, coping.
- •Waste: a 6-yard skip is £230–£380 by region, and spoil is heavier than people expect.
- •Time: two fit people, three to four days for 8m — a day digging, a day on footing and drainage, one to two building and backfilling.
The build, step by step
Work in the drier half of the year, and do not lay mortar below 3°C and falling.
- •1. Set out with string and pins, mark the trench 300mm wider than the wall each side, and scan for buried services.
- •2. Excavate to firm undisturbed subsoil, minimum 450mm below finished ground level — 750mm in shrinkable London clay near trees.
- •3. Lay and compact 100–150mm of MOT Type 1 in two plate passes.
- •4. Cast a footing 150mm thick and twice the wall's width — 400mm for a 200mm wall. Leave it 48 hours.
- •5. Lay the first course dead level on a full mortar bed. Errors here multiply upward, so spend the extra hour.
- •6. Build in stretcher bond, checking level and plumb each course, with a batter of 10–15mm per course into the bank.
- •7. Form weep holes — an open perpend every metre on the second course — so water escapes even if the drain silts.
- •8. Line the dig with geotextile, then bed the land drain on stone at footing level, falling about 1:80 to a soakaway, never to a foul drain.
- •9. Backfill 300mm of clean 20mm stone, wrap the membrane over the top, then soil in 150mm layers compacted by foot.
- •10. Bed the coping with a slight outward fall, point up, and grade the ground above so water runs away from the wall.
Troubleshooting
Problems show up in the first wet winter, which is the real test. A wall that has moved 10mm will move 30mm next year.
- •Damp patches and white efflorescence: normal in year one as mortar cures. Persistent wet with algae means water is coming through, not around — check the weeps.
- •Water standing behind the wall: the drain has no fall, no outfall, or no stone. Excavate and redo; nothing else works.
- •Top course loose: freeze-thaw on flat coping. Rebed with a 5mm outward slope.
- •Stepped hairline cracking at one end: minor settlement. Pencil a dated mark across it and monitor for six months.
- •A bulge within two winters: hydrostatic pressure. Stop planting into the bank and get it assessed.
- •Soil washing over the top: mulch the bed above with 50–75mm of bark — see mulch types and quantities.
When to hand it over
Call an engineer or groundworker if retained height passes 1m, if anything loads the ground within a metre of the top, if the wall supports a drive or building, or if you hit running sand or water in the trench.
The surrounding work is friendlier: a paver patio on the level below and drip irrigation for new planting are weekend jobs. Maintenance is light — clear the weep holes each autumn, keep downpipes discharging away from the bank, and check the face with a level once a year.
Found this useful?
There's plenty more — hundreds of guides and honestly-tested product reviews for every corner of your home.
Browse All Guides