Roofing & Exterior · 6 min read · 10 April 2026
How to Repair Old Plaster Walls (Lath, Lime and Where DIY Has to Stop)
A wall that sounds hollow is not automatically a wall that needs hacking off. How to sound, cut back, refix and re-plaster a period wall properly, and the point at which you should hand it over.
By the Nims Casa editorial team — written from professional cleaning experience and checked against our editorial standards.
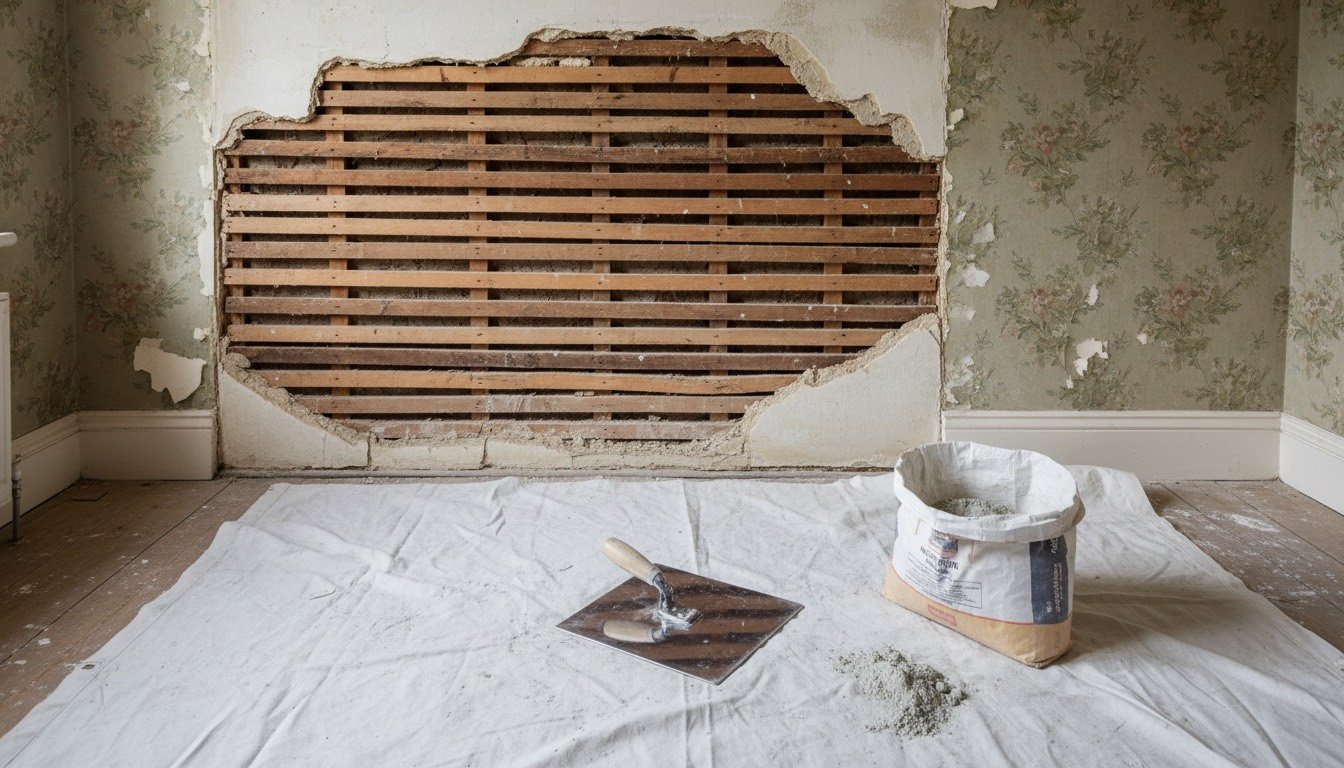
A Victorian wall that sounds hollow when you knock it is not automatically a wall in trouble. Lath and plaster has always moved, and most of what looks alarming is a surface problem sitting on a sound structure. The expensive mistake we see in period houses is somebody hacking a whole wall back to brick because two square metres had failed, then paying a plasterer £600 to reinstate what was fine.
The work is within reach of a careful DIYer, up to a point, and that point sits earlier in a UK period property than most guides admit. Asbestos in textured coatings, lead in old paint, perished rubber cabling and listed building consent all sit between you and the trowel.
Work out what you are actually repairing
Homes built before about 1940 hide three constructions behind the emulsion: lath and plaster on timber studs and ceiling joists, lime plaster laid straight onto solid brick, and a 1980s gypsum skim slapped over either of the first two. Diagnose by sounding. Tap with a knuckle across the wall in a 200mm grid, then press gently with a flat palm. You are testing whether the keys, the nibs of plaster squeezed between the laths, are still holding.
- •Dull, solid tap, no movement: keyed and healthy. Fill and decorate only.
- •Hollow but firm under the palm: some keys have snapped. Refix with plaster washers rather than hacking off.
- •Hollow and springy, or shifting as a whole sheet: the keys have gone. Cut back to sound edges.
- •Crumbling, tide-marked or gritty with salt: a moisture defect, not a plaster defect.
- •Textured or swirled surface in a property built or refurbished before 2000: stop before any tool touches it.
Safety first: asbestos, lead and what is buried in the wall
Artex and similar textured coatings applied before 2000 can contain 1-4% chrysotile asbestos, and dry scraping releases fibres into a room you then live in. A UKAS-accredited lab tests a sample for £30-£60. If it comes back positive, treat it as controlled work or pay a contractor, as our Artex removal guide sets out.
Lead was only properly removed from UK domestic paint in 1992, and levels are highest in pre-1960s gloss on skirtings, architraves and window boards, exactly what you disturb when repairing plaster nearby. Never dry-sand it, never let a heat gun pass 450°C, and keep children out of the room. Our lead paint safety guide covers the wet-abrasion method.
Then the wiring. Houses not rewired since the 1960s often still have rubber-insulated or lead-sheathed cable chased into the plaster, and the insulation crumbles the moment it is disturbed. Isolate the circuit, prove it dead, and treat exposed old cable as a rewire trigger rather than something to tape up. Wear an FFP3 mask and goggles: lime is caustic and burns wet skin.
The DIY-or-pro line, drawn plainly
There is no honest way to say that anyone can plaster. Backing coats forgive a great deal because nobody sees them; finish coats forgive nothing, and a bad skim costs more to correct than it would have cost to have done. Use this split rather than your optimism.
- •DIY: cracks up to about 3mm, crazing and old fixing holes, filled with two-part powder filler rather than decorator's caulk.
- •DIY: patch repairs up to roughly 0.5m² on a wall where the surrounding plaster sounds solid.
- •DIY: refixing drummy but unbroken plaster with stainless plaster washers and 40mm screws into the laths.
- •DIY: bonding-coat backing and one or two small finish patches, accepting they may need feathering with fine filler.
- •DIY: a modest area of lime plaster on a non-listed solid wall, if you are patient between coats.
- •Pro: any ceiling repair over about 0.5m², and every sagging ceiling. Lath and plaster weighs 25-35kg per square metre and comes down as a slab.
- •Pro: skimming a full wall or a whole room to a flat, paint-ready finish.
- •Pro: anything inside a listed building. Stripping historic lime plaster usually needs listed building consent, and doing it without is a criminal offence.
- •Pro: confirmed asbestos, large areas of lead paint, or opening a wall around old cabling. See electrical repairs you should never DIY.
- •Pro: plaster failing because of damp, and any crack that is widening, stepped or running diagonally from a corner.
Tools and materials
A usable kit comes in under £150, and a worn, broken-in trowel finishes better than a new one, so borrow where you can.
- •Stainless 11in plasterer's trowel and hawk: £35-£60 the pair.
- •Plastering float, small tool, bucket trowel, mist sprayer: about £25.
- •Mixing bucket and paddle mixer on a slow-speed drill: £30-£50.
- •Stainless plaster washers, roughly £12 per 100, plus 40mm stainless screws.
- •Bonding coat, 25kg for £11-£14, builds up to 11mm per pass on walls.
- •Multi-finish plaster, 25kg for £12-£16, for the 3mm finish.
- •SBR or grit primer, £18-£25 for 5 litres. PVA is fine over gypsum but should never go onto lime.
- •Lime work: haired coarse stuff or NHL 3.5 with a lime putty finish, £15-£25 per 25kg from a conservation supplier.
- •Scrim tape, plasterboard offcuts, dust sheets, FFP3 mask and goggles.
Realistic time and cost
Materials are trivial: a one square metre patch costs under £25 in plaster and primer. Time is the cost, and most of it is waiting. Bonding must set before the finish goes on, and the finish must dry for days before paint. Plan a patch across two evenings, not one. For comparison, plasterer day rates in 2026 run £180-£280 across most of the UK and £250-£380 in London and the South East, with a £120-£180 minimum for a small call-out. A conservation-accredited lime plasterer is £250-£400 a day.
- •Crack filling and sanding: 1-2 hours, under £10 in materials.
- •A 0.25m² patch on sound laths: half a day of hands-on work spread over two days, £15-£25 in materials.
- •One wall re-backed and skimmed by a plasterer: £180-£350 depending on size and access.
- •Re-skimming a 4m x 4m room, walls and ceiling: £450-£750 over two days, then 5-7 days before anything beyond a mist coat.
- •A lath and plaster ceiling taken down and reinstated in board and skim: £900-£1,600 for a typical bedroom, including waste.
The repair, step by step
Work in a room held between 10°C and 20°C. Below 5°C plaster will not set properly, and forcing it dry with a heater aimed at the wall causes the shrinkage cracking people then blame on the material.
- •1. Kill the circuit serving that wall, sheet the floor and tape a dust sheet across the doorway. Old plaster dust travels through a whole house.
- •2. Sound the wall in a grid, mark every hollow area in pencil, then extend the marks 50mm into solid plaster.
- •3. Cut back to sound plaster. Score the perimeter with a multi-tool, then work a sharp bolster almost flat to the wall. Never lever outwards, or you will drag off good plaster and split the laths.
- •4. Refix what you can save. Around the hole, drive plaster washers and 40mm screws through drummy but whole plaster into the laths at 150mm centres, stopping the instant you feel it crush.
- •5. Prepare the background. Vacuum the laths, knock off broken nibs, and check no cable or pipe crosses the opening. Mist old lime and timber with clean water; seal a gypsum background with diluted SBR.
- •6. Build the backing. Mix bonding stiff, like peanut butter, and press it hard through the laths so it forms new keys behind them. Build in 8-11mm layers, scratch-key each one, and stop 3mm below the surrounding face.
- •7. Let it set: 90-120 minutes for bonding, overnight for anything thicker than 10mm.
- •8. Apply the finish. Lay on roughly 2mm, then a second pass of about 1mm within 20 minutes. Trowel at 20, 45 and 90 minutes, with a light mist of water on the final pass only.
- •9. Feather rather than fight it. Once dry after 3-7 days, correct hollows with fine filler and finish with 180-grit on a pole sander.
- •10. Mist coat and decorate: dilute matt emulsion roughly 3:1 with water for the first coat on new plaster.
Troubleshooting the usual failures
Nearly every failed plaster repair comes down to suction or moisture rather than trowel technique.
- •Finish coat crazing as it dries: the background pulled the water out too fast. Wet it more, or use a bonding agent.
- •The patch showing as a ghost outline through paint: differential suction. Prime the whole wall, not just the repair.
- •Still dark brown after a week: normal drying. Still dark after three weeks means moisture is arriving from somewhere, which our damp and mould guide covers.
- •Yellow bleed through emulsion: soot from a disused chimney breast, nicotine or water staining. Seal with a solvent-based stain block.
- •White fluffy salts: efflorescence. Brush off dry and repeat weekly; washing drives the salts back in.
- •The same crack back within months: movement, not filler failure. See why plaster cracks return.
When to stop mid-job and call someone
Down tools if a ceiling is bowing more than about 10mm, if plaster is coming away in sheets across more than a couple of square metres, if you expose crumbling rubber-insulated cable, or if the cracking is stepped through the brickwork behind. None of those are plastering problems, and plastering over them buys you a winter at best.
Match the trade to the fault: a plasterer for finish quality, a conservation-accredited lime specialist for anything listed or solid-walled, a RICS chartered building surveyor for movement at £400-£700 a report, and a structural engineer if the surveyor says so. When the wall is sound again, use a breathable finish rather than a plastic one, which is why our paint for period homes picks matter more here than in a new build.
Found this useful?
There's plenty more — hundreds of guides and honestly-tested product reviews for every corner of your home.
Browse All Guides