Garden & Outdoor · 5 min read · 3 June 2026
How to Build a Shed Foundation: UK Base Types, Real Costs and Step-by-Step
Sheds rot from the floor up, and the base is nearly always why. Here is what a proper foundation costs in the UK, what the labour actually buys, and how to lay one yourself.
By the Nims Casa editorial team — written from professional cleaning experience and checked against our editorial standards.
Strip out a fifteen-year-old shed and you can usually date the failure to the day it was built. The floor bearers sat straight on soil or on four loose slabs bedded in sand, water wicked up through the timber, and the bottom 100mm of every wall panel went soft while the roof was still perfectly sound. The shed did not wear out. The ground underneath it did the damage.
A base is also the one part of the job where the cost gap between doing it yourself and paying someone is huge in percentage terms and small in absolute terms — a few hundred pounds either way. That makes it worth understanding properly, so here are the real UK numbers, what a groundworker's day rate actually buys, and how to build the base yourself if you decide to.
Which base your shed actually needs
Four options cover almost every UK garden. Price them per square metre of finished base, materials only, at 2026 builders' merchant rates:
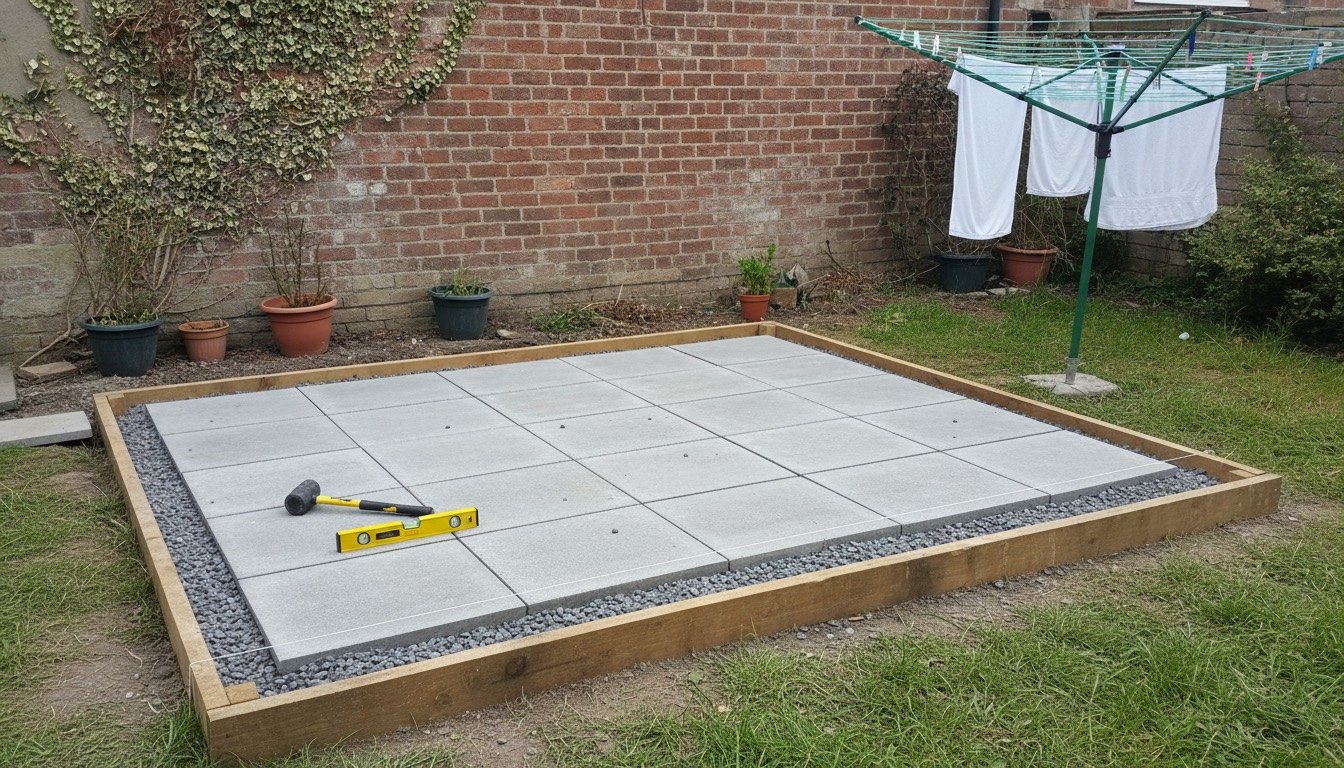
- •Paving slabs on compacted hardcore — £45–65/m². The default for timber sheds up to about 3.6 x 3m. 600 x 600 x 50mm slabs on 100mm of compacted MOT Type 1 and a 30mm sharp sand screed. Reusable, forgiving, easy to level.
- •Concrete raft — £70–110/m² if you hand mix, £90–140/m² for ready-mixed. Right for anything heavy: a metal shed, a workshop with a bench and machinery, or a summerhouse you plan to line and heat. Needs shuttering, a 1200-gauge damp-proof membrane and A142 mesh in anything over 3.5m long.
- •Plastic grid or ECO base systems — £40–70/m². Interlocking cells filled with 20mm pea shingle over a membrane. Genuinely quick, free-draining, and fine for a bike store or a 6 x 4. Only as level as the ground you put it on, so it does not rescue a sloping plot.
- •Concrete pads or ground screws under timber bearers — £25–60/m². Cheapest for a small shed on firm, level ground; the airflow under the floor is a real advantage. Not suitable on soft made ground or fill.
Safety first: services, slabs and wet cement
Digging 200mm down in a British back garden is not risk-free. Gas supplies to garages, armoured cable to outside sockets, and shallow shared drain runs from Victorian and inter-war housing are all commonly found at 150–400mm, far shallower than the standards say they should be. Check the deeds or a drainage plan, look for inspection chamber covers and gully positions, and hire a CAT and Genny (£45–60/day) if you know there is a supply crossing the garden. Never build over an inspection chamber — you will need access to it eventually, and covering it is a problem for whoever sells the house.
- •A 600 x 600 x 50mm concrete slab weighs 30–33kg. Two people, or a slab lifter, or you will hurt your back on slab number nine, not slab number one.
- •Wet cement is caustic (pH 12–13) and causes chemical burns through wet trousers and boots without you feeling it at the time. Nitrile gloves, long sleeves, wellies, rinse splashes immediately.
- •Cutting slabs dry throws respirable crystalline silica. Use a water-fed disc cutter or an angle grinder with a water bottle feed, plus an FFP3 mask and goggles.
- •A vibrating plate compactor (£45–60/day hire) buries hands. Keep the handle at waist height and steer, do not push it against a wall.
Tools and materials for a 2.4 x 1.8m base
This is a standard 8 x 6 shed footprint, 4.32m². Scale everything linearly for a larger base. Hire tools rather than buying: a plate compactor for a day costs less than the sand you will waste trying to compact by hand.
- •Materials: 12 x 600 x 600 x 50mm concrete slabs (£4.50–6.50 each), 1 bulk bag MOT Type 1 (£55–75 delivered), half a bulk bag sharp sand (£30–40), geotextile membrane (£12–20), 4 bags building sand and cement for a semi-dry mortar bed (£25–35), 4 x 2.4m pressure-treated 75 x 47mm bearers if the shed does not come with them (£40–55).
- •Hire: vibrating plate compactor, one day (£45–60 plus deposit). Consider a mini skip or a tonne bag collection for spoil (£70–200).
- •Tools you need: spade, shovel, wheelbarrow, 1.2m spirit level, string line and pegs, rubber mallet, tape, mixing tub, club hammer and bolster or a disc cutter for trimming.
- •Skill level: competent DIY. The hard part is patience with levels, not technique.
Realistic time and cost — and what the labour buys
DIY materials for the 8 x 6 slab base above land at £220–290 including hire and excluding spoil disposal. Add £70–110 if you need a tonne bag collected, or £120–200 for a mini skip. Allow a full weekend: a day to dig, remove spoil and lay the sub-base, a second morning to bed and level the slabs. Do not build the shed the same day you lay a mortar bed — give it 24 hours.
A landscaper or groundworker will quote £450–750 for the same base outside London and £650–950 inside the M25. A 3 x 2.4m (10 x 8) reinforced concrete raft runs £900–1,500. The split is consistently 30–40% materials, 60–70% labour and disposal, because a two-person team costs £320–450 a day in most of the UK and £480–650 in London and the South East. You are paying for a day of two backs, a van, and the spoil disappearing — which is precisely the part of the job most people underestimate.
Worked examples: a 2.4 x 1.8m slab base priced at £560 breaks down as roughly £190 materials, £90 spoil, £280 labour. That is reasonable. A 3 x 2.4m concrete raft at £1,250 breaks down as around £420 materials (ready-mix part load plus mesh, shuttering and membrane), £180 disposal, £650 labour across a day and a half. Also reasonable.
- •Sanity-check a quote by asking for four numbers: excavation depth, sub-base type and compacted thickness, membrane, and where the spoil goes. A quote that names none of those is a guess.
- •Be suspicious of anything under £70/m² fitted. At that price nobody is digging out topsoil or hiring a compactor, and you are buying a 50mm skim laid on soft ground.
- •£90–160/m² all-in is the normal band for a properly dug, compacted and levelled base in 2026.
- •If the quote is for half a day on a base over 6m², ask how. Digging out 1.5 tonnes of spoil by hand is not a two-hour job.
- •Get the base priced separately from the shed. Bundled 'supply and erect' deals often include a base that is four paving slabs on sand — see our breakdown of what a shed costs to build for how those packages are put together.
The build, step by step
Before you start, confirm the shed is permitted development — most garden buildings are, but eaves height, boundary distance and the proportion of garden covered all matter, and a shed over 15m² brings building regulations into play. Our guides on planning permission for a shed and when building regulations apply cover the thresholds.
- •1. Mark out the exact shed footprint with string lines and pegs, then check the diagonals match to within 5mm. A base that is 20mm out of square will fight you when the panels go up.
- •2. Set the base the same size as the shed footprint, or up to 25mm smaller on each side. Bigger is the classic mistake: rain lands on the ledge, splashes back onto the cladding, and the bottom rail rots.
- •3. Dig out 200mm, or deeper if you are still in soft topsoil. You want to reach firm, undisturbed subsoil. Keep the sides of the excavation square.
- •4. Lay geotextile membrane across the base of the hole, lapping up the sides, to stop the hardcore migrating into wet clay over the years.
- •5. Barrow in MOT Type 1 in two 50mm layers, damping each one lightly and compacting with the plate until the surface stops moving under it. Fully compacted, 100mm of Type 1 should sound solid and take no footprints.
- •6. Screed a 25–30mm bed of sharp sand over the sub-base, ruled off level between timber battens. Aim for a 1:60 fall away from the doorway if the ground allows it.
- •7. Bed each slab on five mortar dabs or a full semi-dry bed (4:1 sharp sand to cement), starting from a corner and working along the string line. Tap down with the rubber mallet, checking every slab against its neighbour with the spirit level.
- •8. Butt the slabs tight — no jointing needed on a shed base — and leave the mortar 24 hours before loading it.
- •9. Lay the pressure-treated bearers across the slabs on strips of DPC, then build the shed. That 3–5mm air gap under the floor is what keeps the joists dry.
Troubleshooting a base that is not behaving
Most problems show up in the first winter, which is when British gardens tell you the truth about their drainage.
- •Water pooling on the base after rain: the fall is wrong or non-existent. Lift and re-bed the affected slabs to introduce a 15–20mm drop across a 2.4m run, and check the surrounding ground is not draining towards the shed — if it is, garden drainage is the real fix.
- •One corner sinking within a year: the sub-base was not compacted, or you built over made ground or a backfilled trench. Lift the slabs, dig out and re-compact in 50mm layers. Adding more sand on top will not hold.
- •Slabs rocking underfoot: hollow mortar dabs. Lift, butter fully, re-bed. A rocking slab under a corner post loads the frame unevenly and racks the door.
- •Damp floor and musty smell: no membrane between concrete and timber, or the base sits proud of the shed so rain runs in. Fit DPC strips under the bearers and check the drip line.
- •Green algae on the slabs each winter: normal in shade. Clear it with a stiff brush and a patio cleaner rather than a lance at close range, which erodes the slab surface.
- •Shed too cold to use once the base is right: that is a wall and roof problem, not a floor one — see how to insulate a shed.
When to call a groundworker instead
There are four situations where paying someone is straightforwardly the better decision. A slope of more than about 150mm across the footprint means retaining, which needs blockwork and drainage rather than more hardcore. Made ground, a filled pond or an old outbuilding footprint underneath means you cannot judge bearing capacity by eye. Any base over roughly 12m² is a serious volume of spoil — around 2.5 tonnes for a 200mm dig — and hand-digging it is a genuine two-day slog. And if the building is going to be occupied, insulated and wired as a garden room rather than a store, it needs a designed slab with insulation and a proper DPM, not a shed base.
The honest test is the spoil. If you have nowhere for two tonnes of clay and no way to get a barrow to the front, the day rate you are avoiding is smaller than the misery you are buying. Everything else — a flat lawn, a modest 8 x 6, a free Saturday — is well within reach, and the technique is the same one used for laying a paver patio, just on a smaller and more forgiving scale.
Found this useful?
There's plenty more — hundreds of guides and honestly-tested product reviews for every corner of your home.
Browse All Guides