Kitchens & Bathrooms · 6 min read · 15 June 2026
How to Replace Silicone Sealant Around a Bath (Properly)
Mouldy, peeling sealant makes a clean bathroom look defeated — and it's a £15, two-hour DIY fix. The professional bead, step by step, including the bath-full-of-water trick.
By the Nims Casa editorial team — written from professional cleaning experience and checked against our editorial standards.
Once silicone sealant has black mould rooted inside it, or has pulled away from the tile leaving a dark gap, no amount of scrubbing rescues it. Spray cleaners might lift surface staining for a week, but mould has already worked into the silicone's pores and will bloom back within days. The honest fix is replacement — and it's genuinely one of the most satisfying weekend DIY jobs going: around £15 in materials, a couple of hours' work, and a bathroom that looks freshly renovated.
The gap between a wobbly amateur bead and a crisp professional one isn't skill or expensive tools — it's entirely down to preparation and one slightly odd trick involving a bath full of water. This guide covers stripping the old sealant back to bare tile, masking for a dead-straight line, running and tooling the bead correctly, and choosing a tube that survives a British bathroom's condensation rather than turning grey within a season.
It's also worth knowing why the old bead failed, because resealing over the same conditions just buys another eighteen months. Poor ventilation and condensation usually let mould into sealant in the first place, so pairing this job with tackling condensation properly makes the new bead last considerably longer.
Signs the Sealant Needs Replacing, Not Just Cleaning
Not every stained bead needs stripping out. Surface mould on otherwise intact, well-adhered silicone often responds to a proper clean — a dedicated mould remover gel left on as directed, rather than a quick spray-and-wipe. Our guide to removing mould from bathroom grout and sealant covers that approach.
Replacement is the only answer once the bead has pulled away from the tile anywhere, feels soft or spongy, mould reappears within days of cleaning, or the silicone has gone hard and cracked — typically past the five-to-eight-year mark. A gap behind the bead is the most urgent sign: water tracking behind sealant is how a cosmetic problem turns into damp and an expensive plasterboard repair.
Tools and Materials, With Realistic UK Prices
None of this needs a specialist kit, and the whole job still costs less than a single visit from a tradesperson.
- •Bathroom-grade neutral-cure silicone, one to two tubes — £6–£12 each
- •Sealant or caulking gun — £4–£10, or free if a neighbour has one
- •Sealant removal tool or a sharp Stanley knife — £3–£8
- •Silicone remover gel, for old residue — £5–£9
- •Low-tack masking tape, two to three rolls — £3–£6
- •Methylated spirit, for degreasing the joint — £3–£5
- •A profile/finishing tool, or a finger and washing-up liquid — £2–£5
- •Disposable gloves and a dust mask for the gel stage — a couple of pounds
Stripping the Old Sealant Back to Bare Tile
Rushing this stage is the biggest reason resealed joints fail early — new silicone will not bond to grease, soap scum or old residue, however small the trace.
- •Slice along both edges of the old bead with a removal tool or Stanley knife held flat, then peel out the bulk by hand.
- •Scrape away every remnant, working slowly around corners and the overflow and taps, where old sealant hides.
- •Apply remover gel to any stubborn film, leave it for the time stated on the packaging, then scrape and wipe clean.
- •Treat any mould on the surrounding tile or grout now — see getting rid of damp and mould in UK homes for how to kill it properly, not just bleach the surface.
- •Degrease the whole joint with methylated spirit on a lint-free cloth and leave it bone dry, since trapped moisture stops new silicone curing.
How to Run a Professional-Looking Bead
This is the part that actually decides whether the finished job looks like a tradesperson did it.
- •Fill the bath with water before sealing. A full bath sits several millimetres lower under the weight; sealed empty, the joint stretches every bath-time and cracks early.
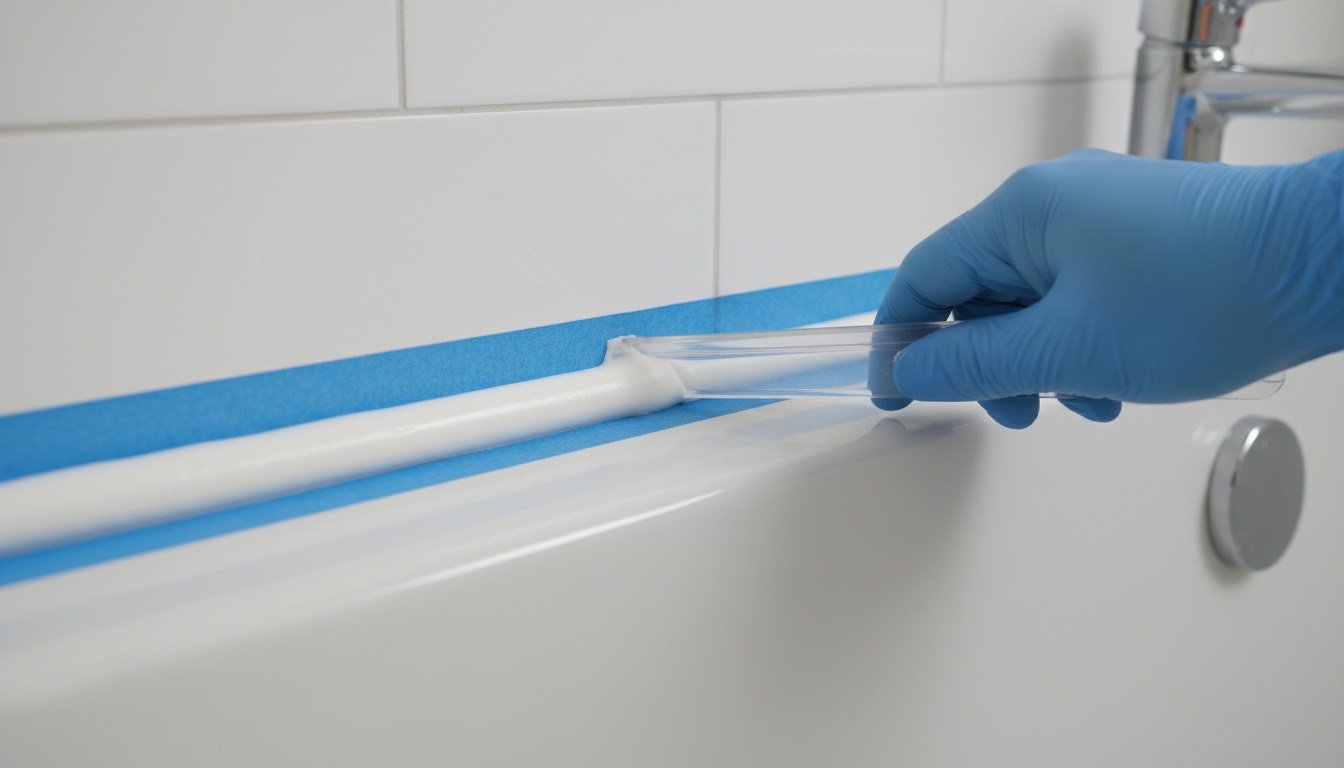
- •Mask both sides of the joint with low-tack tape, 3–4mm apart — the real secret behind dead-straight edges.
- •Cut the nozzle at 45° to match the gap, and run the bead in one continuous, steady pass per edge.
- •Tool it immediately with a profile tool or a soapy finger, one smooth, firm pass — going back over a section usually makes it worse.
- •Pull the tape away at once, while wet, lifting up and away from the bead.
- •Leave the room alone for 24 hours: no water, no touching, however tempting.
Choosing a Silicone That Will Actually Last
Use a sanitary or bathroom-grade neutral-cure silicone with fungicide built in — never decorator's caulk, which is acrylic, isn't fully waterproof, and moulds within months in a wet room. The cheapest bathroom tube on the shelf is usually cutting corners on fungicide concentration, exactly what you're paying for. White shows early mould honestly; clear hides staining for longer but also hides the warning signs; translucent-white is a reasonable middle ground.
A properly prepared, quality bead gives five-plus years of service. A weekly squeegee after showering and running the extractor fan for twenty minutes afterwards will push that further — see tackling bathroom mould and damp for the habits that matter most.
Mistakes That Ruin a Reseal
- •Sealing over any trace of old silicone or soap scum — even a thin film stops the bead bonding and it peels within weeks.
- •Sealing an empty bath, which stretches and eventually splits the joint the first time it's used at full weight.
- •Using acrylic decorator's caulk in a wet area instead of bathroom-grade silicone.
- •Touching or showering within the 24-hour cure window — a disturbed bead rarely sets properly and often needs redoing.
- •Running the bead in stop-start sections instead of one smooth pass, which is what produces a wobbly finish.
- •Ignoring mould on the surrounding grout before resealing, sealing the spores in against the new silicone.
When to Call a Professional
Most resealing is a confident-beginner DIY job, but if water has clearly tracked behind the old sealant for a while — soft flooring near the bath, a musty smell from inside the panel, staining on a ceiling below — that's a job for a plumber or damp specialist first, since sealing over an active leak just hides it. Check persistent issues against common bathroom plumbing mistakes, since a leaking waste can look identical to failed sealant from outside. For a straightforward mould-and-peel job, a tradesperson typically charges £60–£120 — money most homeowners are happy to save.
Frequently asked questions
How long does new bathroom silicone take to cure? Touch-dry within an hour, but it needs a full 24 hours before any water contact and up to seven days for full flexibility — avoid heavy shower steam that first week if possible.
Can I seal over the old silicone if it isn't mouldy? No — silicone doesn't reliably bond to itself once cured, even when it looks fine. Skipping the strip-back is the most common reason a quick top-up peels within a month.
Why does my sealant keep going mouldy so fast? Almost always poor ventilation trapping moisture. Check the extractor fan is actually pulling air, and run it longer after bathing; recurring mould despite a good fan points to a wider condensation issue.
Is clear or white silicone better? White shows early mould honestly, prompting cleaning before it gets bad. Clear looks neater at first but hides discolouration, so staining is often more advanced by the time it's noticed.
Do I need to remove the bath panel to reseal? No — resealing only involves the visible joint, which is fully accessible. The panel only needs removing if you suspect water damage behind it.
What's the widest gap silicone can bridge alone? Up to around 6mm; anything wider should be part-filled with a foam backing rod first so the sealant forms a flexible bridge rather than a thick, crack-prone plug.
Found this useful?
There's plenty more — hundreds of guides and honestly-tested product reviews for every corner of your home.
Browse All Guides