Plumbing · 5 min read · 19 July 2026
How to Test a Sump Pump (UK Cellar and Basement Guide)
A pump that has sat idle since spring is not a working pump, it is an untested assumption. Half an hour and forty litres of water will tell you the truth before the first proper storm does.
By the Nims Casa editorial team — written from professional cleaning experience and checked against our editorial standards.
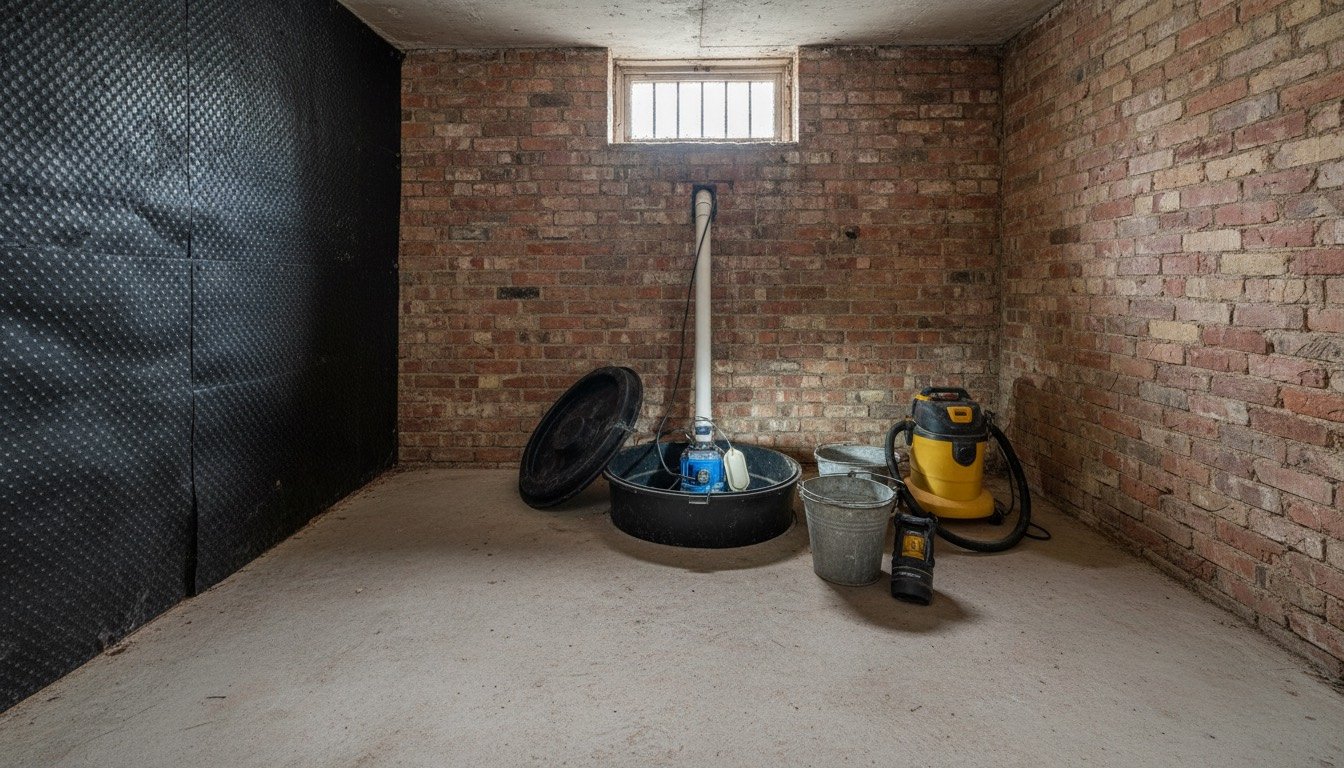
Almost none of the cellar failures we get called to in November are dramatic. The pump has seized after eleven months of standing still, or the float has snagged on its own power cable, or the discharge pipe has silted up outside at the point where nobody ever looks. In every case the owner assumed it was fine because it had always been fine.
A proper test takes thirty to forty-five minutes, costs nothing but a couple of buckets of water, and catches the great majority of faults while they are still cheap. What follows is the routine a waterproofing engineer runs on a Type C cavity drain system, adapted so a competent householder can do most of it. Where the job stops being sensible DIY, we say so plainly rather than leaving you to guess.
Safety first: what to do before you lift the lid
A sump is a hole full of water with a 230V motor in it. That combination deserves respect, and the electrical side is where householders get hurt rather than the plumbing side. Groundwater sumps are dirty but not dangerous to touch once isolated; a packaged foul pumping station is an entirely different job and should not be opened by a homeowner at all.
- •Isolate before your hands go anywhere near the chamber. Unplug the pump or switch off the fused connection unit, and confirm it is dead by trying to start it manually.
- •Press the test button on the 30mA RCD or RCBO protecting the cellar circuit. It should trip instantly. If it does not, stop and get an electrician in before you go further.
- •If the RCD trips while the pump is running, that is insulation breakdown inside a wet motor. Do not keep resetting it. Leave the pump off and have it replaced.
- •Wear nitrile gloves. Sump silt in older UK cellars carries iron ochre, coal dust and the occasional dead rodent.
- •Use a proper torch rather than a phone, and put the lid somewhere you cannot trip over it. Most cellar injuries are trips, not shocks.
Tools, materials, time and cost
Nothing here is specialist. If you already own buckets and a torch you can test a single pump for nothing; the only real spend is a wet-and-dry vacuum, which pays for itself the first time you need to clear silt properly rather than scooping it with a yoghurt pot. Allow 30 to 45 minutes for one pump, or a full hour for a twin-pump chamber with a battery backup and an alarm.
- •Two 10-litre buckets or a full watering can. You need roughly 30 to 40 litres to raise a typical float to its cut-in point.
- •Torch, nitrile gloves and an old towel.
- •Wet-and-dry vacuum, around £45 to £90 from Screwfix, Toolstation or Wickes, for clearing silt and ochre from the chamber base.
- •A short length of garden hose to reach the discharge outfall outside.
- •Plug-in socket tester, £10 to £15, to confirm earth and polarity on the cellar socket.
- •Optional: a clamp meter to compare running current against the figure on the pump's rating plate. A pump drawing well over its rated amps is on borrowed time.
- •Total cost: £0 to £15 if you have the basics, £60 to £120 if you are buying the vac and tester. A professional annual service on a guaranteed system, including jetting the perimeter channel, runs £150 to £280.
How to test a sump pump: the nine-step check
Do this in order. The temptation is to skip straight to pouring water in, but half the faults we find are visible before the pump ever runs. If the chamber is already full to the brim when you open it, you have a different problem entirely and should read up on why a sump pump keeps running before you go any further.
- •1. Lift the lid and look before touching anything. On a healthy cavity drain system the resting water level sits just below the pump's cut-in height, not near the top of the chamber.
- •2. Clear the debris. Scoop out silt and any orange ochre sludge, then finish with the wet vac. Ochre is the single biggest killer of UK cellar pumps because it sets like soft rust around the impeller.
- •3. With the power still isolated, lift the float slowly through its full arc by hand. It must swing clear of the chamber wall, the discharge pipe and, most commonly, its own cable.
- •4. Check the inlet screen or basket at the base of the pump and clear anything caught across it.
- •5. Reconnect the power, stand clear of the chamber, and pour in 30 to 40 litres steadily. The pump should cut in within a second or two of the float reaching its trigger height.
- •6. Time the drawdown. A domestic pump should empty a standard chamber in 15 to 30 seconds. Noticeably slower than last time means a worn impeller or a restricted discharge.
- •7. Listen at cut-out. The motor should stop cleanly and the level should stay down. If the water jumps back up several centimetres, the non-return valve is passing and the pump is re-pumping its own output.
- •8. Repeat the fill twice more. One cycle proves the pump starts. Three cycles prove the float resets reliably, which is where most 'it worked when I tested it' failures actually hide.
- •9. Refit the lid properly. On a sealed system the lid controls radon and humidity as well as smell, so the condition of the gasket matters.
Discharge, alarm and backup: the parts people skip
Testing the pump proves the motor spins. It does not prove the water is going anywhere useful. With a helper running the pump, walk outside and watch the outfall: you want a strong, continuous flow into a surface water drain or soakaway, never into a foul drain without your water company's consent. In winter, any exposed length of discharge pipe needs lagging and a decent fall, because an inch of ice at the outlet turns a working pump into an ornament.
While the pump is running, look for a fine jet from the small weep hole drilled into the riser just above the pump body. That 3 to 5mm hole exists to stop the pump airlocking, and it silts up more often than people realise. If your system has a high-level alarm, lift the alarm float by hand and confirm it sounds within a few seconds, then change its 9V battery annually as routine. For a backup unit, pull the mains plug while the pump is running and confirm it transfers to battery without hesitation; sealed lead-acid batteries in UK cellars typically give three to five years, and our battery backup sump pump buying guide covers what to replace them with.
When the test fails: five faults you will actually find
The same five results come up again and again on domestic systems. Four of them you can deal with yourself in an afternoon.
- •Motor hums but no water moves: jammed impeller or an airlock. Isolate, clear the weep hole, and free the impeller through the inlet. If it will not turn by hand, the pump is finished.
- •Nothing happens at all: check the plug fuse and the RCD first, then the float. A snagged float accounts for more dead pumps than dead motors.
- •Rapid short-cycling: usually a failed non-return valve, occasionally a float set too tightly between cut-in and cut-out. Replacement valves are cheap at around £15 to £30.
- •Weak or trickling discharge: ochre or silt in the pipe, a partially collapsed flexible hose, or ice at the outlet in January.
- •Water level rising while the pump works perfectly: the pump is not the problem, the ingress is. That is a waterproofing question, and a damp basement needs diagnosing before you spend anything more on pumps.
Where DIY stops and a professional takes over
This is the part most guides fudge. Testing, cleaning and float adjustment are genuinely householder jobs. Anything involving the fixed electrical installation or a guaranteed waterproofing system is not, and in England and Wales the electrical side is regulated: a new circuit or socket for a sump pump is notifiable under Part P of the Building Regulations and must be certified by a registered electrician through a competent person scheme, or notified to building control in advance. Scotland and Northern Ireland have their own equivalent requirements.
- •Do it yourself: the bucket test, clearing silt and ochre, freeing a snagged float, cleaning the inlet screen and weep hole, replacing a plug fuse, testing the alarm, changing an alarm battery, and swapping a like-for-like plug-in pump on an unguaranteed system.
- •Call an electrician: any new or altered circuit, socket or spur; an RCD that trips repeatedly; a cellar with no RCD protection at all; anything inside the consumer unit. See electrical repairs you should never DIY for the wider list.
- •Call a waterproofing specialist, ideally a Property Care Association member: any pump forming part of a guaranteed Type C system, because a DIY swap usually voids the guarantee and the insurance-backed cover sitting behind it.
- •Call a drainage engineer: jetting a blocked perimeter channel, re-routing a discharge pipe, or making any new connection to a drain. Checking typical UK plumber rates first will tell you what an hour or two of that work should cost.
- •Stop immediately and call someone if the sump serves foul drainage rather than groundwater, if you smell gas or sewage, or if standing water in the cellar is anywhere near a socket or an appliance.
How often to test, and what to record
Test quarterly as a baseline, and monthly from October through March when the water table is up and the storms are named. Add an extra test before you go away for more than a week, because a pump failure with nobody home is the one that ends in an insurance claim. Manufacturers of guaranteed systems generally require an annual service by an approved contractor to keep the warranty alive, so put that in the diary as well.
Keep two numbers each time: the drawdown in seconds, and whatever you cleaned out. After three or four tests those numbers become a wear curve, and a drawdown creeping from 18 seconds to 35 tells you to budget for a replacement long before it fails on a wet Sunday night. Our guide to sump pump installation costs gives current UK figures, and replacing early is always cheaper than the alternative, which is a basement flood cleanup you had not planned for.
Found this useful?
There's plenty more — hundreds of guides and honestly-tested product reviews for every corner of your home.
Browse All Guides