Organisation & Storage · 6 min read · 19 May 2026
How to Insulate a Garage: Walls, Roof, Door and the UK Regs That Apply
Most British garages are half a brick thick with a leaky roof and a door that whistles. Line one badly and you get black mould behind the plasterboard within two winters. Here is the build-up that works.
By the Nims Casa editorial team — written from professional cleaning experience and checked against our editorial standards.
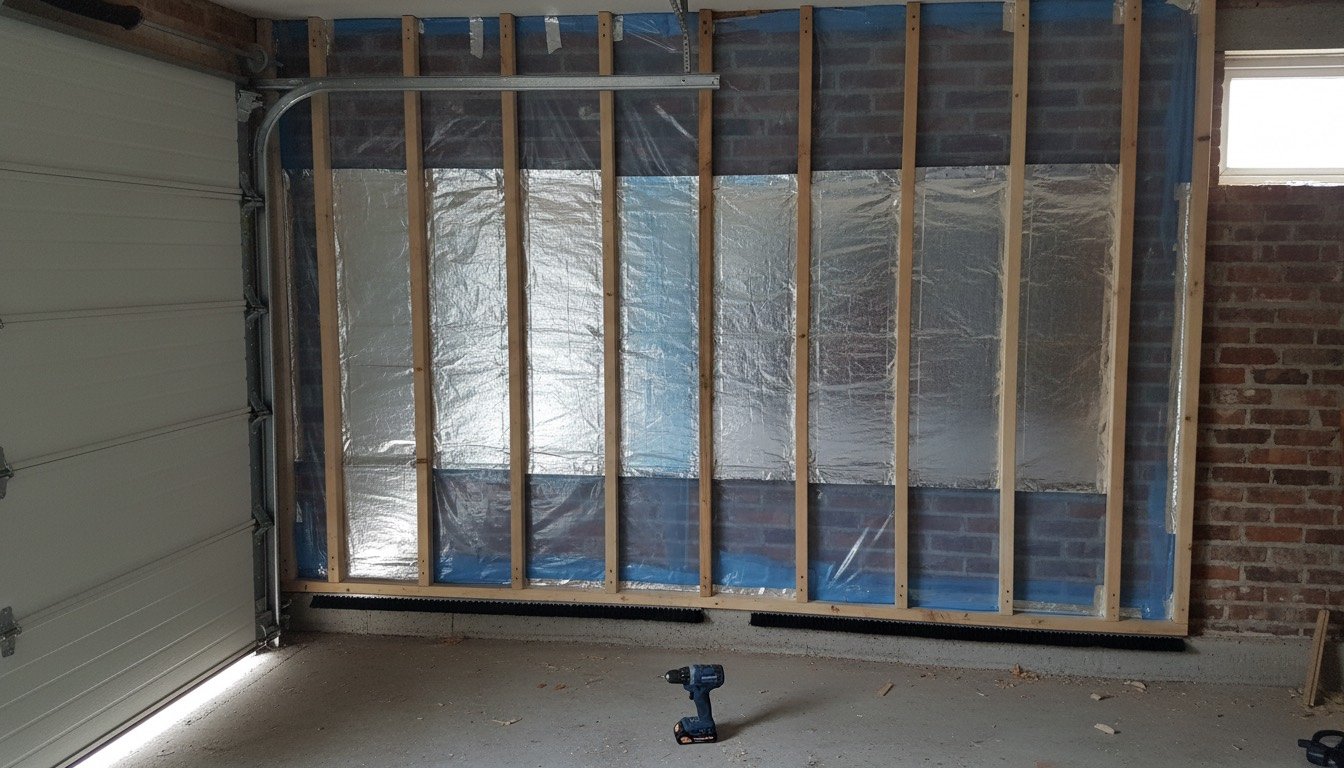
A typical UK garage is a single skin of brickwork 102.5mm thick, no cavity, sitting on an unheated slab under a felt or corrugated roof. Driving rain genuinely passes through that mortar. Press insulation flat against the inside face and you have built a cold, wet sandwich with nowhere for the moisture to go — which is why so many DIY garage linings smell of mushrooms by the second winter.
The method below assumes a dry workshop, gym or store rather than a habitable room. Head towards a bedroom or office and the standards jump sharply, with building control involved. We flag exactly where that line sits.
Safety first: asbestos, fumes and fire
Two of these genuinely hurt people, and neither is obvious to a first-timer.
- •Asbestos: corrugated cement roof sheets fitted before 2000 commonly contain chrysotile. Never drill, cut, sand or jet-wash them. Get a sample tested (£30-50) and, if positive, double-bag it damp for a tip that takes bonded asbestos.
- •Petrol and LPG: a sealed garage storing a mower, a jerrycan or patio gas is a vapour trap. Keep a low-level air brick open, and never board over a vent serving a boiler.
- •Fire: the wall and ceiling between an attached garage and the house must give 30 minutes fire resistance. PIR is combustible and must be fully covered — 15mm fire-rated plasterboard there.
- •Height: garage roofs are fragile — never walk on cement sheet. Isolate at the consumer unit before fixing near a cable.
Tools and materials for a single garage
A single garage is roughly 15-18m² of floor and 45-55m² of wall. Skill level is moderate: if you can build a stud wall square and cut board neatly, you can do this job.
- •SDS drill, driver, insulation saw, 1.8m level, board lifter, FFP3 mask.
- •Treated 25 x 50mm counter-battens, 47 x 50mm CLS studs, 100mm frame fixings.
- •Foil-faced PIR (Celotex, Kingspan, Recticel, EcoTherm): 50mm walls, 100mm ceiling.
- •Foil tape, gun foam, 500-gauge polythene vapour control layer, DPC offcuts.
- •12.5mm plasterboard, 15mm Fireline on the house-facing wall, screws, scrim, filler.
- •A 25mm foil-panel garage door kit, brush side seals and a rubber threshold strip.
Realistic time and cost
Materials for a single garage, walls and ceiling insulated and boarded, come to £700-1,400 at 2026 merchant prices; a 2.4 x 1.2m sheet of 50mm PIR is £32-40. Budget two to three weekends, plus a fortnight of drying if it has been leaking. A joiner doing the same job charges £2,000-3,500 including materials. A habitable conversion with building control sign-off is a different animal at £8,000-20,000 — read our garage conversion comparison and the insulation cost guide first.
The steps, in order
Order matters more than product choice. Every step exists to keep liquid water out and water vapour on the warm side.
- •1. Fix the building first. Clear gutters, patch the felt, repoint soft mortar and get external ground 150mm below the internal slab.
- •2. Dry it out. Run a dehumidifier for 7-14 days and pencil-mark tide lines. If a mark returns after a wet week, find the source — our damp and mould guide covers the culprits.
- •3. Create a drainage gap. Fix treated 25 x 50mm counter-battens vertically at 600mm centres, full height, leaving the bottom 25mm open so water crossing the wall drains out.
- •4. Build the frame. Fix 47 x 50mm CLS studs to the counter-battens at 600mm centres, sole plate on DPC offcuts so timber never sits on damp concrete.
- •5. Fit the insulation. Cut 50mm PIR 2-3mm oversize so it wedges in, then gun-foam every board perimeter. Gaps of even 5mm wreck real performance.
- •6. Kill the cold bridges with a continuous 25mm layer of PIR or insulated plasterboard across the studs; skip it and every batten shows as a dust stripe within a year.
- •7. Seal the warm side. Tape all foil joints, or run 500-gauge polythene lapped 150mm and taped at every joint, socket box and edge.
- •8. Insulate the ceiling, not the roof: 100mm between joists and 170mm over, with 25mm clear at the eaves. A cold flat roof needs a 50mm ventilated void above the insulation, vented both ends.
- •9. Insulate the door — it loses more heat than everything else combined. A 25mm panel kit is £40-90; add brush seals and a threshold strip, then check the spring tension.
- •10. Board, tape and paint, leaving the air brick clear. Slab last: proper floor insulation means digging out, so most people fit 20mm interlocking tiles — see our garage flooring picks.
Where UK regulations actually bite
Insulating a garage that stays a garage is not usually notifiable, and internal work needs no planning permission. Everything changes the moment it becomes a habitable room: that is a material change of use needing Building Regulations approval, as a Building Notice or Full Plans, fees commonly £400-900. Expect to hit roughly 0.18 W/m²K on walls and floors and 0.15-0.16 on the roof, plus Part C for the damp-proof membrane, Part F for ventilation and Part B for interlinked alarms. Check your deeds too: many post-1990 estates carry a condition requiring the garage to stay available for parking, and Article 4 directions remove permitted development rights in some areas.
Electrics matter as much. In England, running a new circuit or sub-main to a garage is notifiable under Part P, so it needs a registered electrician who self-certifies (NICEIC, NAPIT, ELECSA) or notification to building control first; Wales keeps a wider scope that still catches outbuildings. See our list of electrical jobs you should never DIY. Fixed gas and LPG appliances need a Gas Safe registered engineer, and flueless bottled-gas heaters release roughly a litre of water vapour per kilo of gas burned — the last thing a sealed garage needs. Landlords: the five-yearly EICR covers the garage supply, and a converted garage joins the EPC floor area, so it must help clear the MEES minimum.
Troubleshooting the usual failures
- •Water running down the plasterboard in December: the vapour control layer is torn, unsealed, or missing behind a socket box.
- •Damp at low level only: rain splashback or bridged ground levels. Lower the paving or add a gravel margin.
- •Mould behind the boards: no drainage gap, and no fix short of stripping back.
- •Cold stripes at 600mm centres: the continuous cross layer was skipped.
- •Musty smell and dew on the car bonnet: airtight but unheated. Add a background vent and a dehumidifier, or a frost-stat heater.
- •Boards drumming: the sole plate is on damp concrete and moving.
When to stop and call someone
Call someone in if the roof is cement sheet, if the structure is a 1960s prefabricated concrete sectional garage (thin panels, cracked joints, rarely worth insulating), if you need a new circuit, if any gas appliance is involved, or if damp returns once rain ingress is ruled out — that usually means a failed damp-proof course, not condensation.
Stop too if the plan has drifted from workshop to bedroom: retrofitting building control approval costs far more than doing it once. For a timber outbuilding, the same principles scale down in our shed insulation guide.
Found this useful?
There's plenty more — hundreds of guides and honestly-tested product reviews for every corner of your home.
Browse All Guides