Organisation & Storage · 6 min read · 18 May 2026
How to Finish a Basement: The UK Cellar Conversion, Step by Step
Most UK cellars were built for coal, not for living in. Here is the honest version of what it takes to turn one into usable space, what it costs, and what a tenant can do without touching the deposit.
By the Nims Casa editorial team — written from professional cleaning experience and checked against our editorial standards.
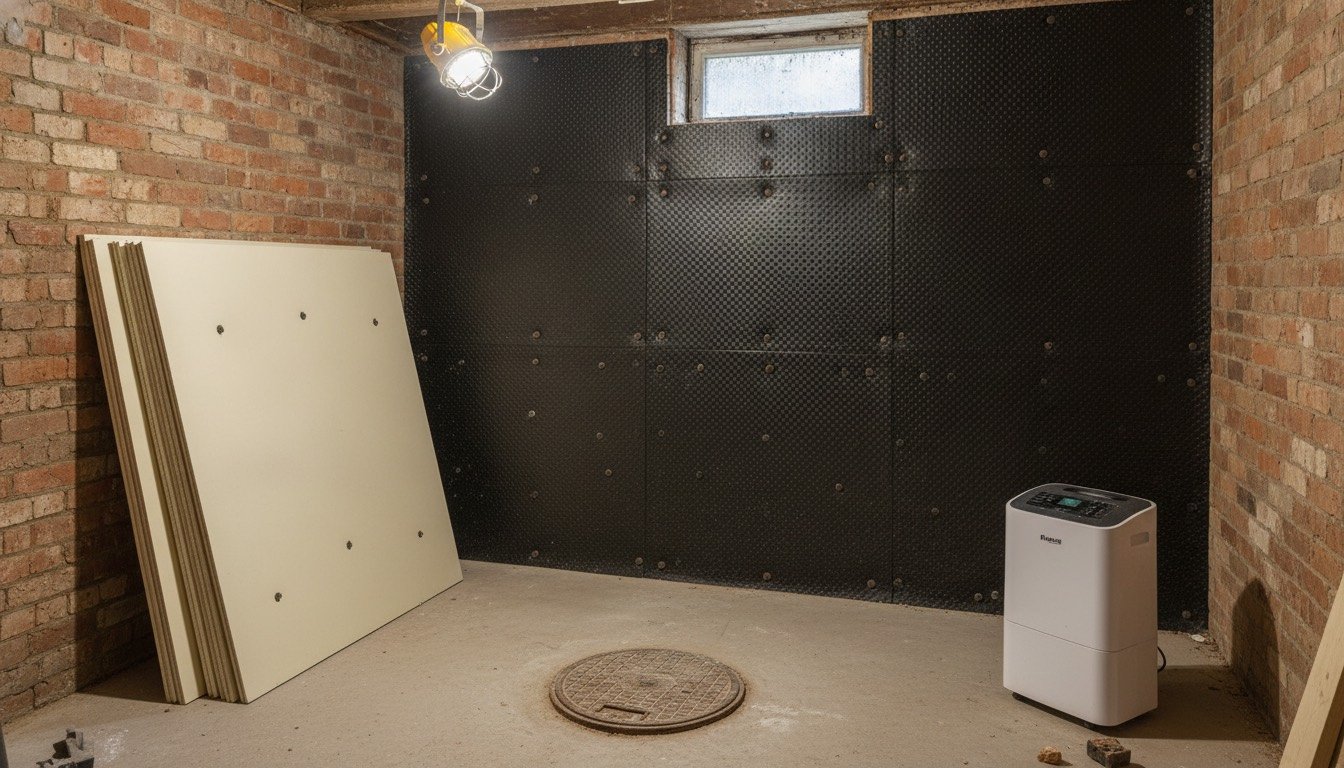
Most cellars under British houses were never meant to be occupied — coal stores and sculleries beneath Victorian terraces, with solid brick walls in wet ground, no damp-proof membrane and 1.9m of headroom on a good day. That decides everything, which is why copying an American basement build-out leaves mould behind new plasterboard inside two winters.
The job splits in two. If the space is dry and you want warm storage, a utility area or a workshop, a competent DIYer can manage most of it over a few weekends for £2,000-£5,000. Want a habitable room and you are into a waterproofing design, Building Regulations approval and a five-figure budget. Getting that wrong at the start is where people lose most.
Safety and legal checks before you touch anything
Below ground, the things that hurt you are invisible. Work through this before buying a board, and be honest about why the space is damp in the first place. A habitable cellar is a material change of use needing Building Regulations approval; planning permission is usually only required if you lower the floor, form a lightwell, or the house is listed.
- •Asbestos: anything refitted before 2000 may have textured coatings or insulation board round the boiler. Do not sand or drill it; a sample test is £30-£60.
- •Radon: cellars concentrate it. Check your postcode on the UKradon map; above the 200 Bq/m3 action level you need a radon sump or positive-input ventilation designed in.
- •Electrics: new circuits are notifiable under Part P and a cellar counts as a damp location. Use an NICEIC or NAPIT registered sparks and budget for electrician day rates.
- •Escape: a habitable basement room needs a protected stairway to a final exit, or a window of 0.33m2 clear opening, 450mm minimum each way, cill 800-1100mm above floor, opening into a climbable lightwell. Interlinked mains-wired alarms throughout.
- •Party Wall etc. Act 1996: digging below a neighbour's foundations needs two months' written notice.
Tools, materials and skill level
Dry-lining and second-fix carpentry are intermediate DIY. Waterproofing design, underpinning and notifiable electrics are not.
Tools: SDS drill with dust extraction, laser level, board lifter, jab saw, multi-tool, wet vac, FFP3 masks. Materials for a Type C system: 8mm studded cavity drainage membrane with tape, rope and plugs; perimeter channel; sump with twin pump and battery backup; 1200-gauge DPM; 50-75mm PIR; 62.5mm insulated plasterboard.
Realistic time and cost
Labour is 55-65 per cent of a full conversion and waterproofing eats most of the rest; add 15 per cent contingency. If you are weighing options, compare a finished attic versus a finished basement first.
- •Dry cellar, storage or utility only, mostly DIY: 3-5 weekends, £2,000-£5,000 for 15-20m2.
- •Full Type C conversion with usable headroom: 6-10 weeks on site at £1,100-£1,700 per m2, so a 20m2 cellar lands at £22,000-£38,000 finished.
- •Lowering the floor or underpinning to reach 2.4m: £2,200-£3,500 per m2, 12-20 weeks, plus £1,200-£2,500 in party wall surveyor fees.
- •Fees: Building Regs £400-£900, structural engineer £600-£1,500, CSSW waterproofing design £400-£900.
The steps, in order
Do not compress this sequence. Every expensive failure we have been called to started with dry-lining before the water was controlled.
- •1. Diagnose the water. Strip out, run a dehumidifier for a fortnight, then watch through a week of heavy rain. Note where it enters and how fast.
- •2. Fix the outside first, because it is cheap: gutters, gullies, downpipes, and external ground at least 150mm below internal floor level. That alone solves much supposed rising damp.
- •3. Get a waterproofing design to BS 8102:2022 from a CSSW-qualified surveyor. For UK cellars it is nearly always Type C cavity drainage, not tanking — see interior versus exterior waterproofing.
- •4. Deal with mould before it is sealed in; learn to identify mould in a cellar rather than painting over it.
- •5. Form the sump chamber, lay the perimeter channel, fit a twin pump with battery backup and a high-water alarm.
- •6. Fit wall and floor membrane, plugged and sealed, lapped into the channel. Nothing may ever be screwed through it again.
- •7. First fix: notifiable electrics, plumbing, and continuous mechanical extract or MVHR for Part F. A sealed, unventilated room becomes a condensation trap.
- •8. Insulate and dry-line: PIR between C-studs, or insulated plasterboard on a mechanically fixed frame, taped and skimmed.
- •9. Floor build-up: DPM, 50-75mm PIR, 22mm moisture-resistant chipboard. Pick flooring that copes below ground — loose-lay LVT, not solid oak.
- •10. Second fix and mist coat, then leave six weeks before final decoration so build moisture leaves through the wall, not the paint film.
The renter-safe version: everything reversible
Tenants get the same damp cellar and none of the tools. A dry, well-lit, useful space can still be built with nothing that leaves a mark — and the damp itself is not your problem. Under the Homes (Fitness for Human Habitation) Act 2018, structural damp and mould are the landlord's repairing obligation: photograph everything on day one and report faults in writing. Get written permission for anything beyond moving furniture, then work reversibly.
- •If a cavity drainage membrane is fitted, never drill it: one screw lets water into the room, and the deposit becomes the least of the argument.
- •Boltless steel shelving, 1800 x 900mm bays at £45-£80, freestanding and 50mm off the wall so air moves behind.
- •Lidded plastic crates on a pallet or 100mm feet. Cardboard on a cellar floor is a mould farm within a season.
- •A 12-20L/day compressor dehumidifier held at 55% RH does more than any coating; our dehumidifier picks cover models that still work in a cold room.
- •Loose-lay LVT or interlocking EVA tiles over a DPM sheet: down in an afternoon, up in an afternoon.
- •Rechargeable PIR LED bars on magnetic strips and plug-in lamps — no new sockets, no spurs. Skip peel-and-stick hooks; they lift paint when they fail.
Troubleshooting the first winter
Judge the job in January, not August. Condensation on reveals or one cold corner means a cold bridge where insulation stops short, usually at the head of the wall or round the stair opening. Efflorescence, the white bloom on bare brick, is salt not water and brushes off dry; if it returns at the same height, you still have lateral water.
A sump pump cycling every few minutes in dry weather means a stuck float, a failed non-return valve or a leaking drain. Musty smells after a month mean the extract is undersized or switched off. Chipboard cupping at the joints means moisture through a DPM lap: lift it rather than lay the floor twice.
When to stop and call someone
Stop if water arrives under pressure through the floor-to-wall joint, if any crack is wider than 3mm or shows movement, if you need more headroom than you have, or if the property is listed. Underpinning and party wall work are not DIY at any skill level.
The other honest stopping point is arithmetic. If a 20m2 conversion costs £30,000 and adds £25,000 to the property, it is a lifestyle decision rather than an investment. Run the figures with our guide to budgeting a home renovation and keep a contingency you never spend on upgrades.
Found this useful?
There's plenty more — hundreds of guides and honestly-tested product reviews for every corner of your home.
Browse All Guides